
Add a profile
Clash for Windows supports two profile import methods:
- Remote subscription URL
- Local configuration file
Method 1: remote subscription URL
Copy a Clash subscription URL from your provider. This guide uses 畅连 as an example.

Open the 配置 (Profiles) page, paste the URL into the field at the top, and click 下载 (Download). When the download finishes, select the new profile to make it active.

Method 2: local configuration file
If you already have a local YAML file, drag it onto the Profiles page or click Import and choose the file.

Select a proxy node
Open 代理 (Proxies) and initially keep 规则 (Rule) selected in the upper-right corner. The four modes work as follows:
- Rule: applies the profile rules to connect directly, use a proxy, or reject traffic.
- Global: sends every request to the current proxy node.
- Direct: connects every request directly without a proxy.
- Script: handles requests according to the script result.
规则 mode is the usual starting point. To troubleshoot a rule, temporarily compare it with Global mode. Expand a policy group and select an available node.

Enable the proxy
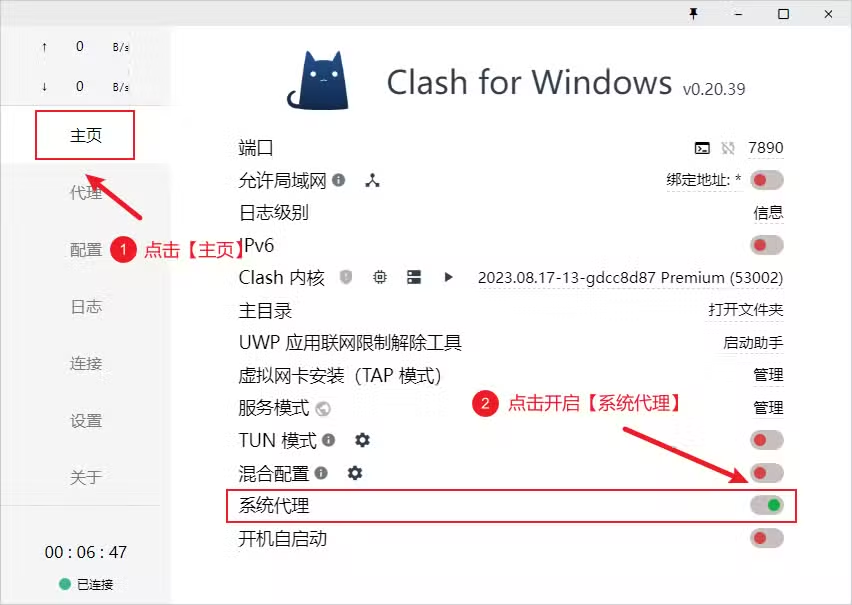
Open 主页 (General) and enable 系统代理 (System Proxy). Once the switch turns green, apps that respect the Windows system proxy will send requests through Clash for Windows.
The tray icon changes to a gold cat. The image below explains the different icon colors.

Launch at startup
To start the client when you sign in to Windows, open 主页 (General) and enable 开机自启动 (Start with Windows). First confirm that the client exits cleanly and restores the proxy correctly.

Update profiles
Open 配置 (Profiles) from the left menu and click 更新全部 (Update All) to refresh every remote profile.
